Home Improvement
How to choose an outdoor garden bench seat?
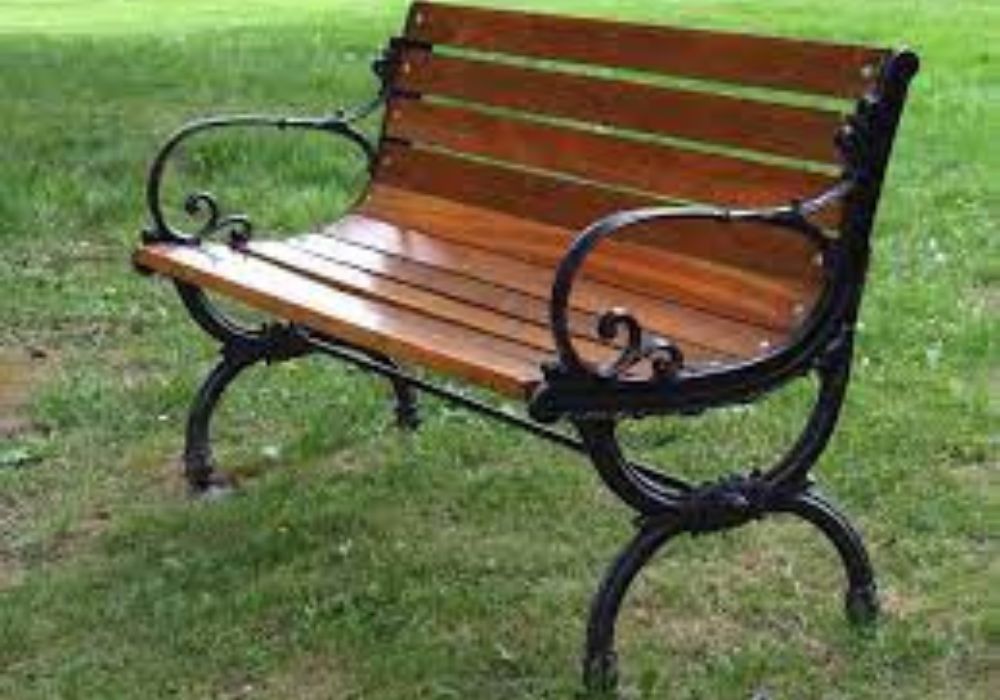
As the name suggests, garden chairs or benches are used outdoors. This chair is also known as an outdoor garden bench or park bench. Having chairs will add to the beauty and comfort of the garden atmosphere, especially if you like relaxing in the garden.
Various models of garden chairs are available on the market. Therefore, we will share tips for choosing a good garden bench so that you are not confused in choosing one. We will also review several products from the best brands for you such as IKEA. Some of them can even withstand various weather conditions such as heat and rain.
Factors To Consider Before Choosing an outdoor garden bench seat
There are many factors to consider before choosing a garden chair. So that you don’t get confused, here are four tips for choosing a garden chair. Please consider these references to ensure the chairs blend well with your garden.
1 Determine the material so that it is durable for outdoor use: Metal, wood, bamboo, or synthetic rattan
When talking about outdoor garden bench or seat, maybe you will imagine chairs made of wood. Even so, now garden chairs made from bamboo and metal are in great demand. There are also manufacturers who combine these ingredients. Well, let’s look at the characteristics of each!
Metal, strong and more resistant to heat and rain
Metal is widely used as a material for outdoor furniture because it is heat and rain resistant and is strong enough to hold heavy weight. However, its large density means that metal furniture tends to be heavier and therefore difficult to move. Even so, metal garden chairs usually come in minimalist designs.
Unfortunately, some metals are known to rust easily which will reduce the aesthetics. If you have your heart set on a metal garden chair, know the type of metal used. Make sure the metal is coated with anti-rust material or other metal that does not rust easily.
Wood is durable and adds a natural impression to the garden
If you choose a wooden chair, you should make sure it has a waterproof coating. Chairs made from durable wood are relatively more expensive compared to chairs made from other materials. However, wooden chairs can be used in the long term so the calculations are more economical.
The durability of a wooden chair also depends on its care and location. Placement of outdoor furniture made of wood should not directly touch the ground. For example, you can place the legs on a layer of cement or stone.
Apart from that, also pay attention to the type of wood used because this can be an indication of the durability of the chair. Types of wood that are known to be of high quality as furniture materials include teak and acacia.
Bamboo tends to be economical and more environmentally friendly
If your budget is very limited, maybe a bamboo chair could be the answer. Even though it is economical, bamboo furniture that is properly cared for is said to last up to seven years . Bamboo is also relatively flexible in shaping so that the furniture models produced are more diverse.
Apart from being affordable, bamboo chairs are also more environmentally friendly. Why so? Bamboo is vegetation that is very easy to grow, it can even reach 10 cm per day. This is different from wood which takes decades to be ready to be cut and processed. Not only that, bamboo is more easily decomposed by the soil because it doesn’t require a lot of paint and coating.
Synthetic rattan, free to choose color and texture
Synthetic rattan is a furniture material made from plastic. This material is one of the material choices for garden benches. Unlike natural rattan, synthetic rattan is suitable for use in outdoor areas.
Even though it has different basic materials, the flexible properties of natural rattan are also shared by synthetic rattan. Therefore, this material can provide unique surface motifs and textures. One of the advantages of synthetic rattan is the unlimited color choices , from neutral to bright colors, because it is made of plastic.
2 Pay attention to the capacity of the park bench: For one or more people
So that you can sit comfortably, garden chairs should have a seat length of 60 cm for one person or 120 cm for two people . You can choose a chair with a longer seat for three people to sit on. The number of members in your family can also be used as a benchmark in choosing garden chairs.
However, in general, garden chairs have a seat length of 120 cm which can only be occupied by two adults. Meanwhile, the longer and bigger a chair, the more expensive it is. A chair that is too long will be difficult to transport and move. So, it is better to buy two garden chairs than buying one chair that is too long.
3 Check the thickness of the material so that the chair is safe to sit on
The obstacle in buying garden chairs online is the difficulty in assessing and estimating the size of the product. To overcome this, ask the seller or manufacturer for information about the support capacity of the chair. Apart from that, you should choose a chair with a support that exceeds the body weight of all your family members.
If you already know the maximum load of your garden chair, avoid occupying the chair with a number of people that exceeds its capacity.
Unfortunately, there is not much information regarding the maximum weight of each chair. However, there is some product information as a benchmark. Benches with a capacity of one person can generally support a maximum weight of 110 kg. Then, the maximum accumulated weight that can be accommodated by a bench with a capacity of two people is 180 kg. The bench for three people can be occupied by several people with a total weight of 210 kg.
4 Whenever possible, choose one that is easy and quick to assemble
When buying garden chairs or other furniture items, it’s a good idea to choose products that are easy to assemble. Garden chairs are generally large in size so they are difficult to assemble alone. Therefore, read the information and user reviews , then choose a chair that can be assembled quickly and easily. Even if there is, choose a product that contains a chair with a set of assembly tools.
Apart from benches that need to be assembled, there are also chairs that are ready-made, meaning they don’t need to be assembled. You can use this type of chair straight away. Even though it is easier to use, shipping the finished chair tends to be less concise. The cost of shipping a finished garden chair is usually more expensive because it takes up larger dimensions.
If you want to choose a chair that has been assembled, it’s a good idea to choose a seller who is located in the same city. That way, the shipping process is easier and shipping costs are cheaper.
Conclusion:
The garden, like any other part of the house, needs refreshing every once in a while. If you do that, it is possible that the garden chairs will also be moved to a new location.
That is the reason why it is better to choose one that is easy to assemble. You even need to have a set of tools to assemble it. If you are not sure you can do it, you can ask the shop first.
Park chairs or park benches have now become a necessity for metropolitan residents. Narrow land forces people to optimize the surroundings of the house so that it feels green.
Read Also:


We often wonder how to remove a stain. And if there are any stain specialists, it’s our darlings! Our future artists often confuse their copies with their clothes: pen stain, grease stain, paint stain… The list goes on! Let’s get ready to make them disappear! Here’s how to remove stains from clothes.
Some Quick Tips for Removing a Stain More Easily
Speed of action:
A stain that has just been done can be removed more easily because it has not had time to irreparably damage the fibers.
Basic rules:
If you just got a stain and you’re not sure what to do, wet the stain with cold water (heat can set the stain permanently), scrub it fabric gently with vegetable oil or Marseille soap, rinse with cold water and hang the garment in the shade.
Test fabrics:
Each fabric reacts differently to solvents. Put a single drop on a hidden part of the garment to test the reaction before cleaning your stain.
Delicate and colored fabrics:
Use a clean cloth that has been soaked in a suitable stain remover and pat without rubbing.
Durable fabrics:
Take a clean cloth soaked in a stain remover. Fold the cloth and rub it softly between your hands.
Use the same fabric to avoid pilling:
Using the same type of fabric as the garment being cleaned (e.g. wool with wool, cotton with cotton, and silk with silk, etc.).
Move the stain:
When removing stains, place an absorbent cloth such as cotton or paper towel, so that when diluted it will move from the fabric to the fabric below
Avoid marks:
Use a minimum of solvent and rub gently to avoid marks on t-shirts for example.
Stubborn stains:
Before washing, wet the garment with cold milk and soak it in salt water overnight.
Wash it and hang it to dry : for each solvent, use as little as possible to avoid damaging the fiber. Wash in cold water, and hang your garment in the shade.
How to remove stains from white clothing?
White clothes are wardrobe essentials. However, they tend to yellow over time. To whiten your white shirts and t-shirts without damaging them, use lemon juice. The method is simple:
- Pour lemon juice into a basin of cold water at the rate of 3 lemons per liter of water
- Soak the clothes for an hour
- Rinse thoroughly with clean water.
Have you spilled an oily product, coffee or tomato sauce on your white dress? Rest assured, there is still a solution to restore its shine. Here’s how to remove a grease or coffee stain from your clothing:
- Rub the affected area with Marseille soap (do not wet the stain)
- Leave to act for an hour
- Lather the soap with water
- Scrub again, possibly using a soft-bristled brush
- Wash the garment directly in the machine.
How to remove a difficult stain from colored clothing?
Here are the rules to follow to remove stains from colored clothing without damaging it:
- Treat the stain before machine washing
- Make sure that the stain remover does not discolor the fabric (be careful with soda crystals)
- Avoid harsh products like bleach
- If the traces resist the chosen stain remover, rinse before switching to another. Indeed, the products risk mixing and damaging your clothing.
Now that you know the precautions, move on to cleaning using 70° alcohol. You can use it to remove grease stains from colored clothing . 70° alcohol is just as effective against traces of ink or blood.
Follow these 2 simple steps:
- Dab the stains with a cloth soaked in alcohol
- Rinse as quickly as possible.
The baking soda/shampoo combination is also an excellent alternative:
- Pour a dab of shampoo onto the stained area
- Rub gently
- Sprinkle with baking soda
- Rub again
- Rinse immediately.
How to remove stains from clothing?
Ammonia is one of the products capable of removing stubborn stains such as those left by grape juice, red wine or blood. However, it should be used with caution. By wearing gloves, you will avoid contact with your hands. Cleaning should also be carried out in a ventilated area. Indoors, remember to open doors and windows beforehand.
Focus on the steps to follow to remove stubborn stains from your clothing:
- Dilute the ammonia with water (the more fragile the fabric, the more diluted the cleaning product should be)
- Dab the stain with a cloth soaked in the mixture
- Rinse as quickly as possible
- Machine wash your garment.
Ink, ketchup or foundation stains on clothing? Rubbing alcohol comes to your rescue. In addition to its disinfecting power, this household product gets rid of stubborn dirt, especially since it is easy to use. You simply need to:
- Get yourself a cotton swab
- Soak it with a mixture of water (¼) and alcohol (¾)
- Dab the stubborn stain with this preparation
- Machine wash your garment.
How to remove a stain from already washed clothing?
Ink marks are among the most stubborn stains. Fortunately, it is possible to get rid of it using 2 tips: vinegar or toothpaste.
Here’s how to remove an ink stain from previously washed clothing :
- Soak it with white vinegar
- Rub
- Rinse.
You can also :
- Moisten your clothing
- Scrub the ink stain with a little toothpaste and a brush
- Rinse.
Note that this second solution also works on oil or butter stains.
How to remove stains that won’t go away?
Have you tried several tips, but none seem to work? Try to rub some Marseille soap on the stain. This cleaning product is your ally in removing stains and keeping your clothes clean and spotless. It is effective for:
- Remove greasy stains from clothing
- Eliminate traces of coffee, sauce or chocolate
- Whiten laundry
- Deodorize washable textiles (curtain, tablecloth, carpet, etc.).
To remove stains with Marseille soap, nothing could be simpler
- Rub the soap on the stain.
- Leave it for 15 minutes.
- Rinse.
FAQs
How to remove stubborn stains from clothes?
It is also possible to soak the stain in cold salt water, then rub with a Marseille soap stain remover stick and leave to act for approximately 1 hour. Once the product has worked, simply clean again with a cloth soaked in water with a drop of white vinegar.
Does baking soda remove stains?
Baking soda does even worse, it has no effect on greasy and oxidizable stains, it only removes old blood stains relatively well . So stain remover manufacturers don’t have to worry, their products will continue to sell.
How to remove stains after washing?
If a grease stain is still present on your tablecloth or clothing after it has been put in the washing machine, start by rubbing the stubborn stain with dry Marseille soap. Once a sort of crust has formed, leave it on for about 15 minutes.
Read Also:
Learn the ins and outs of exterior and interior wall insulation in this comprehensive guide. Discover everything you need to know to keep your home comfortable and energy-efficient.
How to insulate the walls of a house from the outside?
Insulating walls from the outside is more efficient. This method is indicated for houses that also need a facade renovation.
Exterior insulation under coating
This process is the most affordable in terms of exterior insulation. It consists of fixing the insulation panel to the wall using different techniques:
- Bonding, with prior stripping of the wall in the event of renovation;
- Wedging with mortar, followed by fixing using dowels;
- The use of profiles to form retaining rails.
After fixing the insulation, the professional makes joints between the plates. He then proceeds to the finishing with the installation of the coating.
Exterior insulation under cladding
In addition to insulation, cladding allows you to renovate a wall in poor condition. Knowing that the facade will be modified, an authorization request must be submitted to the municipality before carrying out the work.
The insulation technique under cladding consists of fixing a frame on the wall, then installing the insulating plate on it. This frame is then covered with cladding, keeping an air gap to ensure moisture evacuation.
You have the choice between different types of cladding: wood, steel, aluminum, etc. This covering considerably improves the exterior appearance of the wall while ensuring effective protection against bad weather.
Which insulation to choose and what thickness for wall insulation?
Several materials are available for wall insulation:
Natural insulators
Natural insulators such as cellulose wadding, sheep’s wool, cork or plant fibers are especially suitable for interior insulation. Their price is generally higher compared to other materials.
Synthetic insulators
Synthetic insulators such as polyurethane (PU) or expanded polystyrene (PEE) are suitable for exterior as well as interior insulation. They are especially interesting in the form of plates. Their price is more affordable compared to natural insulators.
Mineral insulation
Mineral insulation such as glass wool or rock wool. They exhibit excellent thermal and acoustic properties. In addition, their price is much more accessible like glass wool. Available in several shapes, they are also easy to set up. Glass wool is one of the most efficient materials, providing good resistance with a limited thickness. It also offers good sound insulation.
Depending on the insulation technique chosen, it is possible to use insulating plates or bulk materials. For example, in the case of interior insulation under a metal frame, the professional can opt for blowing in loose insulation if necessary. Thus, the wall is completely covered despite the irregularities.
The thickness of the insulation is determined by the condition of the wall and the performance of the chosen material. Following exterior insulation work in energy renovation, the walls must achieve a thermal resistance of 3.7 m2/K/W. The craftsman will be able to determine the most appropriate thickness to achieve this resistance, taking into account the performance of the material.
How to properly insulate a wall from the inside?
Insulating walls from the inside is both simpler and more affordable. It is done piece by piece. This method is interesting for homes with a facade in good condition or one that cannot be modified.
Insulation of a smooth wall by glued lining
For a wall in good condition and perfectly flat, insulation by glued lining is the most practical. This involves directly gluing lining panels to the wall using glue or adhesive mortar.
The panel is made up of an insulating board and a plaster facing board which are glued together. The facing plate is used for finishing, you can then paint it or cover it with wallpaper. There are lining panels suitable for damp walls to prevent the effects of condensation.
Installation of air gap insulation: an effective method for insulating a porous wall
The air gap insulation method is recommended for walls made of soft stone, rammed earth, lime joints or any other porous material. It is also an interesting solution for walls very exposed to bad weather. The installation of an air gap ensures the water balance of the wall.
The operation requires the installation of battens to accommodate the insulating plate. A minimum distance of 2 cm must be kept between the wall and the battens: this is the air gap. This will absorb the hygrometric variations of the wall. Installing a vapor barrier helps protect the interior from humidity.
Insulation under metal frame: an ideal technique for old walls
In the presence of a wall with an irregular surface or in poor condition, the method of insulation under a metal frame is particularly suitable. However, it can also be applied to flat walls in good condition, in renovation as well as in new buildings.
The insulation plate is directly attached to the wall, then held by a metal frame. On this, the craftsman places a plasterboard finishing plate. With this insulation from the inside, it is possible to pass cables and pipes without drilling the wall or the insulation. They can in fact circulate behind the finishing plate.
The masonry counter-partition, an impeccable finish for irregular walls
This technique is also interesting for damaged walls, especially if you want an aesthetic finish. It consists of directly fixing the insulation to the wall, then installing a new wall in front in order to trap the insulation there.
The thickness of this added wall is approximately 5 cm. It is made of tiles or plaster bricks, and therefore covered with a coating.
Conclusion:
Insulating your home’s walls, whether from the exterior or interior, is essential for maintaining comfort and energy efficiency. Exterior insulation methods, such as under coating or cladding, offer effective solutions for renovating and enhancing the facade while providing insulation. When selecting insulation materials, consider options like natural, synthetic, or mineral insulators, each offering unique benefits and performance.
For interior insulation, techniques like glued lining, air gap insulation, or insulation under a metal frame provide practical solutions tailored to different wall conditions. Whether improving thermal resistance or addressing irregularities, proper insulation contributes to a more comfortable and sustainable living environment.
Read Also:

When you move your house, the question that comes to your mind is ” How to move a refrigerator ?” It is perfectly normal for you to think and feel uneasy. Because the refrigerator is one of the largest items in our home. In fact, when we compare it in terms of weight and size, the refrigerator is the most troublesome item to carry in our home. In this article, I will explain to you how the refrigerator should be transported and the questions you need to know about its transportation. Thanks to the experiences we have gained over the years, I will tell you the tips of carrying a refrigerator.
How to Move a Refrigerator?
This tip will discuss the correct way to move a refrigerator. It seems quite trivial, right? But did you know, it turns out that mistakes in moving the refrigerator can damage the components inside. It will help you if your refrigerator has four wheel axles so it is easy to move by simply sliding and pushing. But if not, you need to be more careful when moving it. Here are a few useful tips for moving a refrigerator correctly.
Defrost
Turn the refrigerator panel to defrost mode. We often encounter frozen water deposits in the freezer like frost. Under normal conditions, this process will take around 6-8 hours. It’s best to do this at night, so that in the morning you just drain the water and dry it.
Empty the refrigerator.
After the ice has melted, remove all food and drinks from the refrigerator. Choose food that is still good and set it aside or throw away anything that has wilted. Pack in a plastic bag or box.
Remove the shelves inside.
It is a good idea to remove all the shelves, compartments and trays in the refrigerator temporarily. Then, wrap each one in cloth or paper and then put it back together after the moving process is complete.
Disconnect the electrical connection.
Unplug the electrical connection and let it sit for several hours before cleaning. Gently wipe and clean every corner with a soft cloth.
Refrigerator Moving Process
Things to pay attention to when moving the refrigerator:
Packing
If necessary, cover the refrigerator with a soft cloth or cardboard. This can reduce the risk of abrasions due to impacts when moved.
Transport in a standing position
Slowly, transport the refrigerator in a standing position, do not lay it down. Inside the refrigerator, there is an important electronic component called the compressor. Wrong position when transporting the battery causes oil leaks in the compressor.
Use tools.
Ask family or friends for help in transporting the refrigerator. To make the moving process easier, use tools in the form of hand trucks, dolly straps or lifting straps.
Pay attention to the position of the refrigerator.
Pay attention to positioning the refrigerator after moving. Try not to immediately turn on the refrigerator, leave it for several hours after moving, ideally 2-3 hours. Don’t place the refrigerator close to a wall or other object behind and on either side of the refrigerator body, leave a distance of several cm, remember that in the refrigerator body there is a condenser/heat exhaust pipe (try holding the refrigerator body and it will definitely feel warm/hot).
Replace the shelves inside
After the move is complete, reinstall the shelves, compartments and trays that were previously removed temporarily. If you have plugged in the electricity connection to turn on the refrigerator. Those are the important tips for moving a refrigerator when moving.
FAQs
How to move a refrigerator easily?
Tilt the refrigerator against the wall and place the two front corners on folded towels. Next, tilt the refrigerator forward, away from the wall, and slide it forward a few steps using the towels. You will need two or more people to do this safely.
How to move a fridge without damaging the floor?
- Move a refrigerator without scratching its floors
- Defrost your refrigerator first.
- Remove the shelving and attach the doors.
- Get a cart or hand cart.
- Use folded towels or cloth mats to protect the floor.
- Loading the refrigerator onto the trolley or trolley.
Can you transport a fridge lying down?
Whether the fridge is new or not, remember that you should never transport a fridge horizontally, otherwise you risk damaging it. It is imperative to keep it in a vertical position, or as vertically as possible, and ensure that the motor always remains downwards.
How to move a heavy fridge?
First of all, do nothing and leave the fridge stable for several hours after unplugging it. Then, remove the drawers, bins and windows so as not to break them during transport. After that, you can finally move your refrigerator with a hand truck and straps, preferably standing up.
Read Also:
-
 Top1 year ago
2022 US House committee releases Trump’s tax returns, capping a years-long battle
-

 Top1 year ago
Interview With Niantic CEO John Niantsullivan
-

 News12 months ago
USPS EMPLOYEE ASSISTANCE PROGRAM SERVICES AND BENEFITS
-

 Top11 months ago
Understanding the Healing Process of Nose Piercings – A Comprehensive Guide
-

 Tech12 months ago
USPS LiteBlue ePayroll: A Comprehensive Guide
-

 More12 months ago
List Of Unblocked Game Sites 2023
-

 Cryptocurrency10 months ago
Bridging the Gap: Binbex Futures
-

 Cryptocurrency10 months ago
Bitcoin For beginners: The Ultimate Guide