Home Improvement
Robotic Pool Cleaners: how they work and their advantages
Now that you’ve acquired a house with a swimming pool or are completing the installation of your brand-new pool in your garden, the necessity for a robotic pool cleaner becomes evident. As you delve into the various cleaning options for your pool, you’ll find that robotic pool cleaners offer an efficient solution. These innovative devices are designed not only to uphold impeccable hygiene standards for your pool water but also to meticulously care for the pool’s bottom, walls, and water line.
What are the advantages of robotic pool cleaners
In order to fully understand the subject, we will first see, in detail, the mode of operation of the autonomous pump integrated into your swimming pool, then discover the advantages of investing in this famous swimming robotic pool cleaners. It will, without a doubt, be your partner for many years.
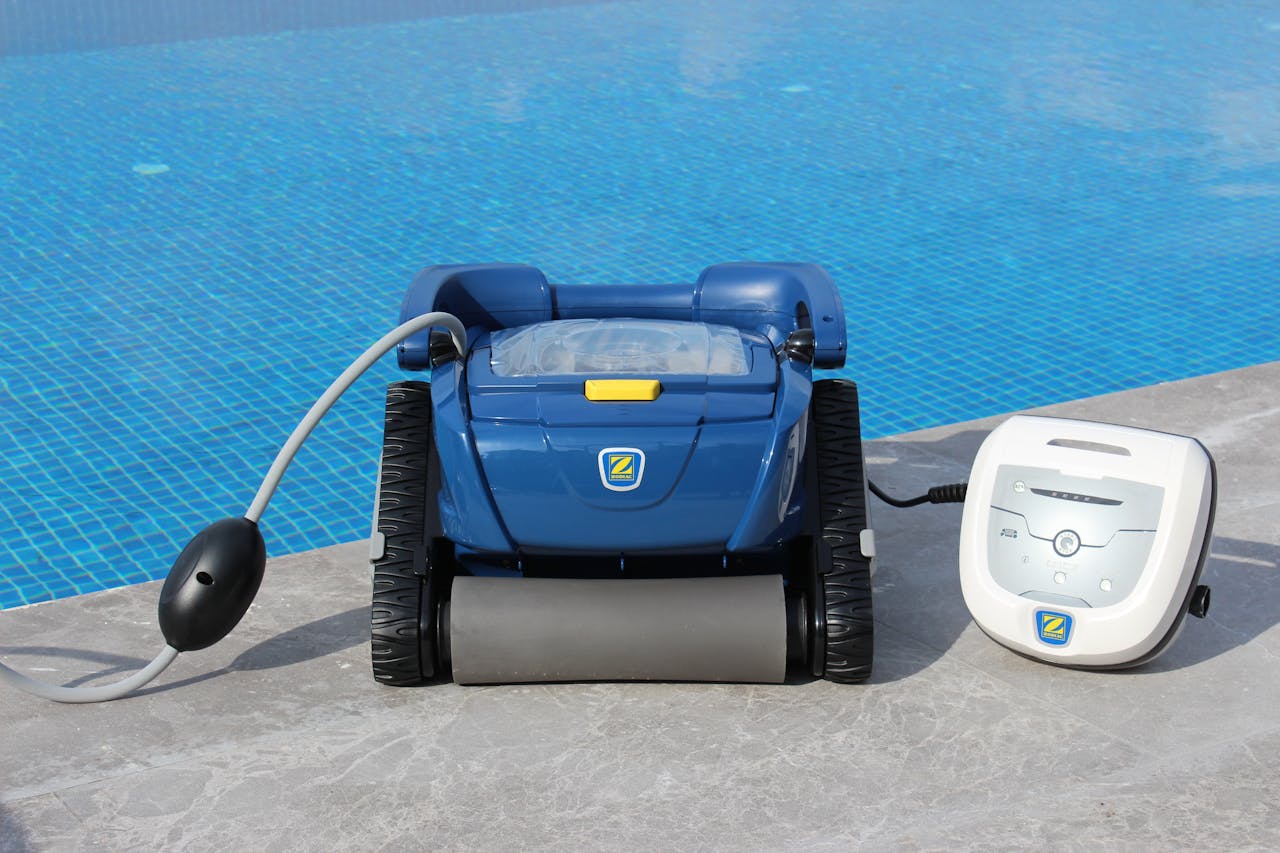
What is an electric pool robot? It is in fact a robot equipped with one or more brushes which travels the walls and the bottom of the swimming pool, autonomously. Through its successive passages, it also accesses the nooks and crannies of the swimming pool and rids it of any deposits on its walls . Its suction and brushing system cleans the pool perfectly and contributes both to the conservation of the coating (liner for example) and to the hygiene of the pool itself. We will see, a little later, that there are also hydraulic robots operating without a motor, but dependent on the filtration system.
Discover the role of your filtration system in the maintenance of your swimming pool
A cleaning robot alone is not effective. It complements your filtration system. This is why every swimming pool comes with a complete filtration system that cleans and filters the pool water permanently. Its role is therefore to recover all the fine impurities present in the water and to put clean water back into circulation.
The filtration system
The pump is installed outside the swimming pool, either directly on the side, if the swimming pool is small, or in a converted room where the maintenance products, the broom and the landing net will be stored, without forgetting our famous robot electric pool cleaning.
This pump, equipped with an electric motor, is the heart of the swimming pool cleaning circuit. The water is suctioned from different places in the pool:
- on the surface, by skimmers which are vents located at the level of the water line;
- at the bottom, through a drain and a broom socket, which collect the water by suction.
What is the role of a swimming pool filtration pump?
The water sucked in by the pump passes through a sand filter which stops the largest impurities. This water is then reinjected into the basin. The aim of this filtering is to remove suspended matter , but also to ensure regular mixing of the water allowing the treatment products to be uniformly present in the bathing water.
The water is therefore stirred regularly by a turbine then is sucked up, filtered and discharged into skimmers located opposite those which suck up the water. This hydraulic network thus ensures endless circulation of water which can be treated or heated before returning to the pool.
This operation therefore does not take into account the dirt and impurities which may be deposited along the walls of the swimming pool . This is where your cleaning robot comes in.
How the robot works and the benefits of automated pool cleaning
As you will have understood, the robot cleaner works in parallel with your filtration system.
Difference between a robot vacuum cleaner and an electric cleaning robot
There are two types of robots to clean your pool:
- the hydraulic robot which operates thanks to the swimming pool pump;
- the electric robot with independent motor.
How does the hydraulic robot work to clean your swimming pool?
Its operation is quite simple: the robot must work in conjunction with the swimming pool’s hydraulic pump. It is therefore autonomous without really being so. It plugs either into a special socket installed in one of the skimmers, or into the broom socket located on the side of the pool. You must therefore carefully check, before purchasing your cleaning robot, that the connection pipe is long enough and adapted to the dimensions of your swimming pool.
The robot vacuums all the walls of the pool and sends the collected impurities to the pump through its connection pipe. Its operation is therefore ensured by a depression of the water which carries it and holds it along the wall. It should be noted that this hydraulic robot only vacuums and does not sweep, except for certain high-end models.
You must have a pump powerful enough to carry the cleaning robot and obtain a satisfactory result. If the flow rate of your hydraulic pump is too low, the robot will not be able to move. It is therefore imperative, before choosing among the robot models and making your purchase, to know the power of your suction pump.
The advantages of cleaning the pool wall using an electric robot
If you don’t have a pump powerful enough to add a hydraulic cleaning robot, look into the electric robot which is truly autonomous. Its mission: clean your swimming pool, quickly and efficiently. It plugs either into a mains socket, or runs on battery after charging on a simple electrical socket. It is programmed to move according to perfect logic and adapts depending on the model to all swimming pool configurations.
- vertical walls;
- bottom of the pool;
- steps;
- water line.
Putting the cleaning brushes of the electric pool robot into action
This electric robot is made up of brushes which remove impurities before they are sucked up by the robot. You will therefore choose the type of brush according to the coating of your swimming pool:
- pin brushes for liner type coating ;
- foam brushes for polyester and resin (shell) or tiled swimming pools.
The cleaning action can be programmed according to your needs. You can carry out regular maintenance or more extensive cleaning, after a prolonged absence for example. The electric robot can, for some of them, be configured remotely using a remote control or a phone application or, more simply, by directly selecting the cleaning cycle on the device itself.
As we have just seen, this electric robot, through the presence of suitable brushes, ensures perfect sweeping of the bottom of the pool and, depending on the model, the walls and the water line of the pool. It is obviously more expensive to purchase than a hydraulic robot vacuum cleaner, but the result has nothing to do with it in terms of quality.
Comparison between hydraulic robot and electric robot for cleaning swimming pool walls
To conclude, let’s make a comparison between hydraulic robots and electric robots. Each device obviously has advantages over the other. We can particularly focus on the purchase price of hydraulic devices which is much lower than an electric brush device.
The main advantages of the hydraulic robot
- it is simple to install, as it does not need any electrical outlet to operate;
- connects directly to the swimming pool filtration system via a broom socket located in the pool or to a skimmer;
- it has a long lifespan since it is not connected to electricity. It has a hydraulic operating system and without electronics;
- it has a very affordable price between 60 and 500 €. Be aware, however, that it costs around €300 for a fairly efficient device in terms of cleaning;
- it is autonomous for the suction of waste.
The disadvantages of the hydraulic robot
- only certain models clean the walls;
- requires good pump power;
- is not completely effective in corners;
- only aspires.
The multiple advantages of the electric robot for cleaning a swimming pool
- brush and vacuum the bottom of the pool and, depending on the model, the walls and the water line;
- adapts depending on the model to steps and height differences;
- allows pump filtration to continue without loss of power;
- has its movements controlled by advanced technology;
- cleans vertical walls without problem for the models concerned;
- performs quality cleaning, including in corners;
- is completely autonomous.
The disadvantages of the electric robot
- the price;
- the cost of repair in the event of a problem.
Read Also:

We often wonder how to remove a stain. And if there are any stain specialists, it’s our darlings! Our future artists often confuse their copies with their clothes: pen stain, grease stain, paint stain… The list goes on! Let’s get ready to make them disappear! Here’s how to remove stains from clothes.
Some Quick Tips for Removing a Stain More Easily
Speed of action:
A stain that has just been done can be removed more easily because it has not had time to irreparably damage the fibers.
Basic rules:
If you just got a stain and you’re not sure what to do, wet the stain with cold water (heat can set the stain permanently), scrub it fabric gently with vegetable oil or Marseille soap, rinse with cold water and hang the garment in the shade.
Test fabrics:
Each fabric reacts differently to solvents. Put a single drop on a hidden part of the garment to test the reaction before cleaning your stain.
Delicate and colored fabrics:
Use a clean cloth that has been soaked in a suitable stain remover and pat without rubbing.
Durable fabrics:
Take a clean cloth soaked in a stain remover. Fold the cloth and rub it softly between your hands.
Use the same fabric to avoid pilling:
Using the same type of fabric as the garment being cleaned (e.g. wool with wool, cotton with cotton, and silk with silk, etc.).
Move the stain:
When removing stains, place an absorbent cloth such as cotton or paper towel, so that when diluted it will move from the fabric to the fabric below
Avoid marks:
Use a minimum of solvent and rub gently to avoid marks on t-shirts for example.
Stubborn stains:
Before washing, wet the garment with cold milk and soak it in salt water overnight.
Wash it and hang it to dry : for each solvent, use as little as possible to avoid damaging the fiber. Wash in cold water, and hang your garment in the shade.
How to remove stains from white clothing?
White clothes are wardrobe essentials. However, they tend to yellow over time. To whiten your white shirts and t-shirts without damaging them, use lemon juice. The method is simple:
- Pour lemon juice into a basin of cold water at the rate of 3 lemons per liter of water
- Soak the clothes for an hour
- Rinse thoroughly with clean water.
Have you spilled an oily product, coffee or tomato sauce on your white dress? Rest assured, there is still a solution to restore its shine. Here’s how to remove a grease or coffee stain from your clothing:
- Rub the affected area with Marseille soap (do not wet the stain)
- Leave to act for an hour
- Lather the soap with water
- Scrub again, possibly using a soft-bristled brush
- Wash the garment directly in the machine.
How to remove a difficult stain from colored clothing?
Here are the rules to follow to remove stains from colored clothing without damaging it:
- Treat the stain before machine washing
- Make sure that the stain remover does not discolor the fabric (be careful with soda crystals)
- Avoid harsh products like bleach
- If the traces resist the chosen stain remover, rinse before switching to another. Indeed, the products risk mixing and damaging your clothing.
Now that you know the precautions, move on to cleaning using 70° alcohol. You can use it to remove grease stains from colored clothing . 70° alcohol is just as effective against traces of ink or blood.
Follow these 2 simple steps:
- Dab the stains with a cloth soaked in alcohol
- Rinse as quickly as possible.
The baking soda/shampoo combination is also an excellent alternative:
- Pour a dab of shampoo onto the stained area
- Rub gently
- Sprinkle with baking soda
- Rub again
- Rinse immediately.
How to remove stains from clothing?
Ammonia is one of the products capable of removing stubborn stains such as those left by grape juice, red wine or blood. However, it should be used with caution. By wearing gloves, you will avoid contact with your hands. Cleaning should also be carried out in a ventilated area. Indoors, remember to open doors and windows beforehand.
Focus on the steps to follow to remove stubborn stains from your clothing:
- Dilute the ammonia with water (the more fragile the fabric, the more diluted the cleaning product should be)
- Dab the stain with a cloth soaked in the mixture
- Rinse as quickly as possible
- Machine wash your garment.
Ink, ketchup or foundation stains on clothing? Rubbing alcohol comes to your rescue. In addition to its disinfecting power, this household product gets rid of stubborn dirt, especially since it is easy to use. You simply need to:
- Get yourself a cotton swab
- Soak it with a mixture of water (¼) and alcohol (¾)
- Dab the stubborn stain with this preparation
- Machine wash your garment.
How to remove a stain from already washed clothing?
Ink marks are among the most stubborn stains. Fortunately, it is possible to get rid of it using 2 tips: vinegar or toothpaste.
Here’s how to remove an ink stain from previously washed clothing :
- Soak it with white vinegar
- Rub
- Rinse.
You can also :
- Moisten your clothing
- Scrub the ink stain with a little toothpaste and a brush
- Rinse.
Note that this second solution also works on oil or butter stains.
How to remove stains that won’t go away?
Have you tried several tips, but none seem to work? Try to rub some Marseille soap on the stain. This cleaning product is your ally in removing stains and keeping your clothes clean and spotless. It is effective for:
- Remove greasy stains from clothing
- Eliminate traces of coffee, sauce or chocolate
- Whiten laundry
- Deodorize washable textiles (curtain, tablecloth, carpet, etc.).
To remove stains with Marseille soap, nothing could be simpler
- Rub the soap on the stain.
- Leave it for 15 minutes.
- Rinse.
FAQs
How to remove stubborn stains from clothes?
It is also possible to soak the stain in cold salt water, then rub with a Marseille soap stain remover stick and leave to act for approximately 1 hour. Once the product has worked, simply clean again with a cloth soaked in water with a drop of white vinegar.
Does baking soda remove stains?
Baking soda does even worse, it has no effect on greasy and oxidizable stains, it only removes old blood stains relatively well . So stain remover manufacturers don’t have to worry, their products will continue to sell.
How to remove stains after washing?
If a grease stain is still present on your tablecloth or clothing after it has been put in the washing machine, start by rubbing the stubborn stain with dry Marseille soap. Once a sort of crust has formed, leave it on for about 15 minutes.
Read Also:

Learn the ins and outs of exterior and interior wall insulation in this comprehensive guide. Discover everything you need to know to keep your home comfortable and energy-efficient.
How to insulate the walls of a house from the outside?
Insulating walls from the outside is more efficient. This method is indicated for houses that also need a facade renovation.
Exterior insulation under coating
This process is the most affordable in terms of exterior insulation. It consists of fixing the insulation panel to the wall using different techniques:
- Bonding, with prior stripping of the wall in the event of renovation;
- Wedging with mortar, followed by fixing using dowels;
- The use of profiles to form retaining rails.
After fixing the insulation, the professional makes joints between the plates. He then proceeds to the finishing with the installation of the coating.
Exterior insulation under cladding
In addition to insulation, cladding allows you to renovate a wall in poor condition. Knowing that the facade will be modified, an authorization request must be submitted to the municipality before carrying out the work.
The insulation technique under cladding consists of fixing a frame on the wall, then installing the insulating plate on it. This frame is then covered with cladding, keeping an air gap to ensure moisture evacuation.
You have the choice between different types of cladding: wood, steel, aluminum, etc. This covering considerably improves the exterior appearance of the wall while ensuring effective protection against bad weather.
Which insulation to choose and what thickness for wall insulation?
Several materials are available for wall insulation:
Natural insulators
Natural insulators such as cellulose wadding, sheep’s wool, cork or plant fibers are especially suitable for interior insulation. Their price is generally higher compared to other materials.
Synthetic insulators
Synthetic insulators such as polyurethane (PU) or expanded polystyrene (PEE) are suitable for exterior as well as interior insulation. They are especially interesting in the form of plates. Their price is more affordable compared to natural insulators.
Mineral insulation
Mineral insulation such as glass wool or rock wool. They exhibit excellent thermal and acoustic properties. In addition, their price is much more accessible like glass wool. Available in several shapes, they are also easy to set up. Glass wool is one of the most efficient materials, providing good resistance with a limited thickness. It also offers good sound insulation.
Depending on the insulation technique chosen, it is possible to use insulating plates or bulk materials. For example, in the case of interior insulation under a metal frame, the professional can opt for blowing in loose insulation if necessary. Thus, the wall is completely covered despite the irregularities.
The thickness of the insulation is determined by the condition of the wall and the performance of the chosen material. Following exterior insulation work in energy renovation, the walls must achieve a thermal resistance of 3.7 m2/K/W. The craftsman will be able to determine the most appropriate thickness to achieve this resistance, taking into account the performance of the material.
How to properly insulate a wall from the inside?
Insulating walls from the inside is both simpler and more affordable. It is done piece by piece. This method is interesting for homes with a facade in good condition or one that cannot be modified.
Insulation of a smooth wall by glued lining
For a wall in good condition and perfectly flat, insulation by glued lining is the most practical. This involves directly gluing lining panels to the wall using glue or adhesive mortar.
The panel is made up of an insulating board and a plaster facing board which are glued together. The facing plate is used for finishing, you can then paint it or cover it with wallpaper. There are lining panels suitable for damp walls to prevent the effects of condensation.
Installation of air gap insulation: an effective method for insulating a porous wall
The air gap insulation method is recommended for walls made of soft stone, rammed earth, lime joints or any other porous material. It is also an interesting solution for walls very exposed to bad weather. The installation of an air gap ensures the water balance of the wall.
The operation requires the installation of battens to accommodate the insulating plate. A minimum distance of 2 cm must be kept between the wall and the battens: this is the air gap. This will absorb the hygrometric variations of the wall. Installing a vapor barrier helps protect the interior from humidity.
Insulation under metal frame: an ideal technique for old walls
In the presence of a wall with an irregular surface or in poor condition, the method of insulation under a metal frame is particularly suitable. However, it can also be applied to flat walls in good condition, in renovation as well as in new buildings.
The insulation plate is directly attached to the wall, then held by a metal frame. On this, the craftsman places a plasterboard finishing plate. With this insulation from the inside, it is possible to pass cables and pipes without drilling the wall or the insulation. They can in fact circulate behind the finishing plate.
The masonry counter-partition, an impeccable finish for irregular walls
This technique is also interesting for damaged walls, especially if you want an aesthetic finish. It consists of directly fixing the insulation to the wall, then installing a new wall in front in order to trap the insulation there.
The thickness of this added wall is approximately 5 cm. It is made of tiles or plaster bricks, and therefore covered with a coating.
Conclusion:
Insulating your home’s walls, whether from the exterior or interior, is essential for maintaining comfort and energy efficiency. Exterior insulation methods, such as under coating or cladding, offer effective solutions for renovating and enhancing the facade while providing insulation. When selecting insulation materials, consider options like natural, synthetic, or mineral insulators, each offering unique benefits and performance.
For interior insulation, techniques like glued lining, air gap insulation, or insulation under a metal frame provide practical solutions tailored to different wall conditions. Whether improving thermal resistance or addressing irregularities, proper insulation contributes to a more comfortable and sustainable living environment.
Read Also:

When you move your house, the question that comes to your mind is ” How to move a refrigerator ?” It is perfectly normal for you to think and feel uneasy. Because the refrigerator is one of the largest items in our home. In fact, when we compare it in terms of weight and size, the refrigerator is the most troublesome item to carry in our home. In this article, I will explain to you how the refrigerator should be transported and the questions you need to know about its transportation. Thanks to the experiences we have gained over the years, I will tell you the tips of carrying a refrigerator.
How to Move a Refrigerator?
This tip will discuss the correct way to move a refrigerator. It seems quite trivial, right? But did you know, it turns out that mistakes in moving the refrigerator can damage the components inside. It will help you if your refrigerator has four wheel axles so it is easy to move by simply sliding and pushing. But if not, you need to be more careful when moving it. Here are a few useful tips for moving a refrigerator correctly.
Defrost
Turn the refrigerator panel to defrost mode. We often encounter frozen water deposits in the freezer like frost. Under normal conditions, this process will take around 6-8 hours. It’s best to do this at night, so that in the morning you just drain the water and dry it.
Empty the refrigerator.
After the ice has melted, remove all food and drinks from the refrigerator. Choose food that is still good and set it aside or throw away anything that has wilted. Pack in a plastic bag or box.
Remove the shelves inside.
It is a good idea to remove all the shelves, compartments and trays in the refrigerator temporarily. Then, wrap each one in cloth or paper and then put it back together after the moving process is complete.
Disconnect the electrical connection.
Unplug the electrical connection and let it sit for several hours before cleaning. Gently wipe and clean every corner with a soft cloth.
Refrigerator Moving Process
Things to pay attention to when moving the refrigerator:
Packing
If necessary, cover the refrigerator with a soft cloth or cardboard. This can reduce the risk of abrasions due to impacts when moved.
Transport in a standing position
Slowly, transport the refrigerator in a standing position, do not lay it down. Inside the refrigerator, there is an important electronic component called the compressor. Wrong position when transporting the battery causes oil leaks in the compressor.
Use tools.
Ask family or friends for help in transporting the refrigerator. To make the moving process easier, use tools in the form of hand trucks, dolly straps or lifting straps.
Pay attention to the position of the refrigerator.
Pay attention to positioning the refrigerator after moving. Try not to immediately turn on the refrigerator, leave it for several hours after moving, ideally 2-3 hours. Don’t place the refrigerator close to a wall or other object behind and on either side of the refrigerator body, leave a distance of several cm, remember that in the refrigerator body there is a condenser/heat exhaust pipe (try holding the refrigerator body and it will definitely feel warm/hot).
Replace the shelves inside
After the move is complete, reinstall the shelves, compartments and trays that were previously removed temporarily. If you have plugged in the electricity connection to turn on the refrigerator. Those are the important tips for moving a refrigerator when moving.
FAQs
How to move a refrigerator easily?
Tilt the refrigerator against the wall and place the two front corners on folded towels. Next, tilt the refrigerator forward, away from the wall, and slide it forward a few steps using the towels. You will need two or more people to do this safely.
How to move a fridge without damaging the floor?
- Move a refrigerator without scratching its floors
- Defrost your refrigerator first.
- Remove the shelving and attach the doors.
- Get a cart or hand cart.
- Use folded towels or cloth mats to protect the floor.
- Loading the refrigerator onto the trolley or trolley.
Can you transport a fridge lying down?
Whether the fridge is new or not, remember that you should never transport a fridge horizontally, otherwise you risk damaging it. It is imperative to keep it in a vertical position, or as vertically as possible, and ensure that the motor always remains downwards.
How to move a heavy fridge?
First of all, do nothing and leave the fridge stable for several hours after unplugging it. Then, remove the drawers, bins and windows so as not to break them during transport. After that, you can finally move your refrigerator with a hand truck and straps, preferably standing up.
Read Also:
-
 Top2 years ago
2022 US House committee releases Trump’s tax returns, capping a years-long battle
-

 Top2 years ago
Interview With Niantic CEO John Niantsullivan
-

 News1 year ago
USPS EMPLOYEE ASSISTANCE PROGRAM SERVICES AND BENEFITS
-

 Top1 year ago
Understanding the Healing Process of Nose Piercings – A Comprehensive Guide
-

 Auto1 year ago
Top Porsche Taycan Incentives: Save Big
-

 Business12 months ago
Does 7-Eleven Take Apple Pay
-

 Business11 months ago
Beware Of Fake Emails And Fake Apple Pay Images
-

 Tech1 year ago
USPS LiteBlue ePayroll: A Comprehensive Guide