Health
Calculus Bridge Causes, Treatment and Preventions
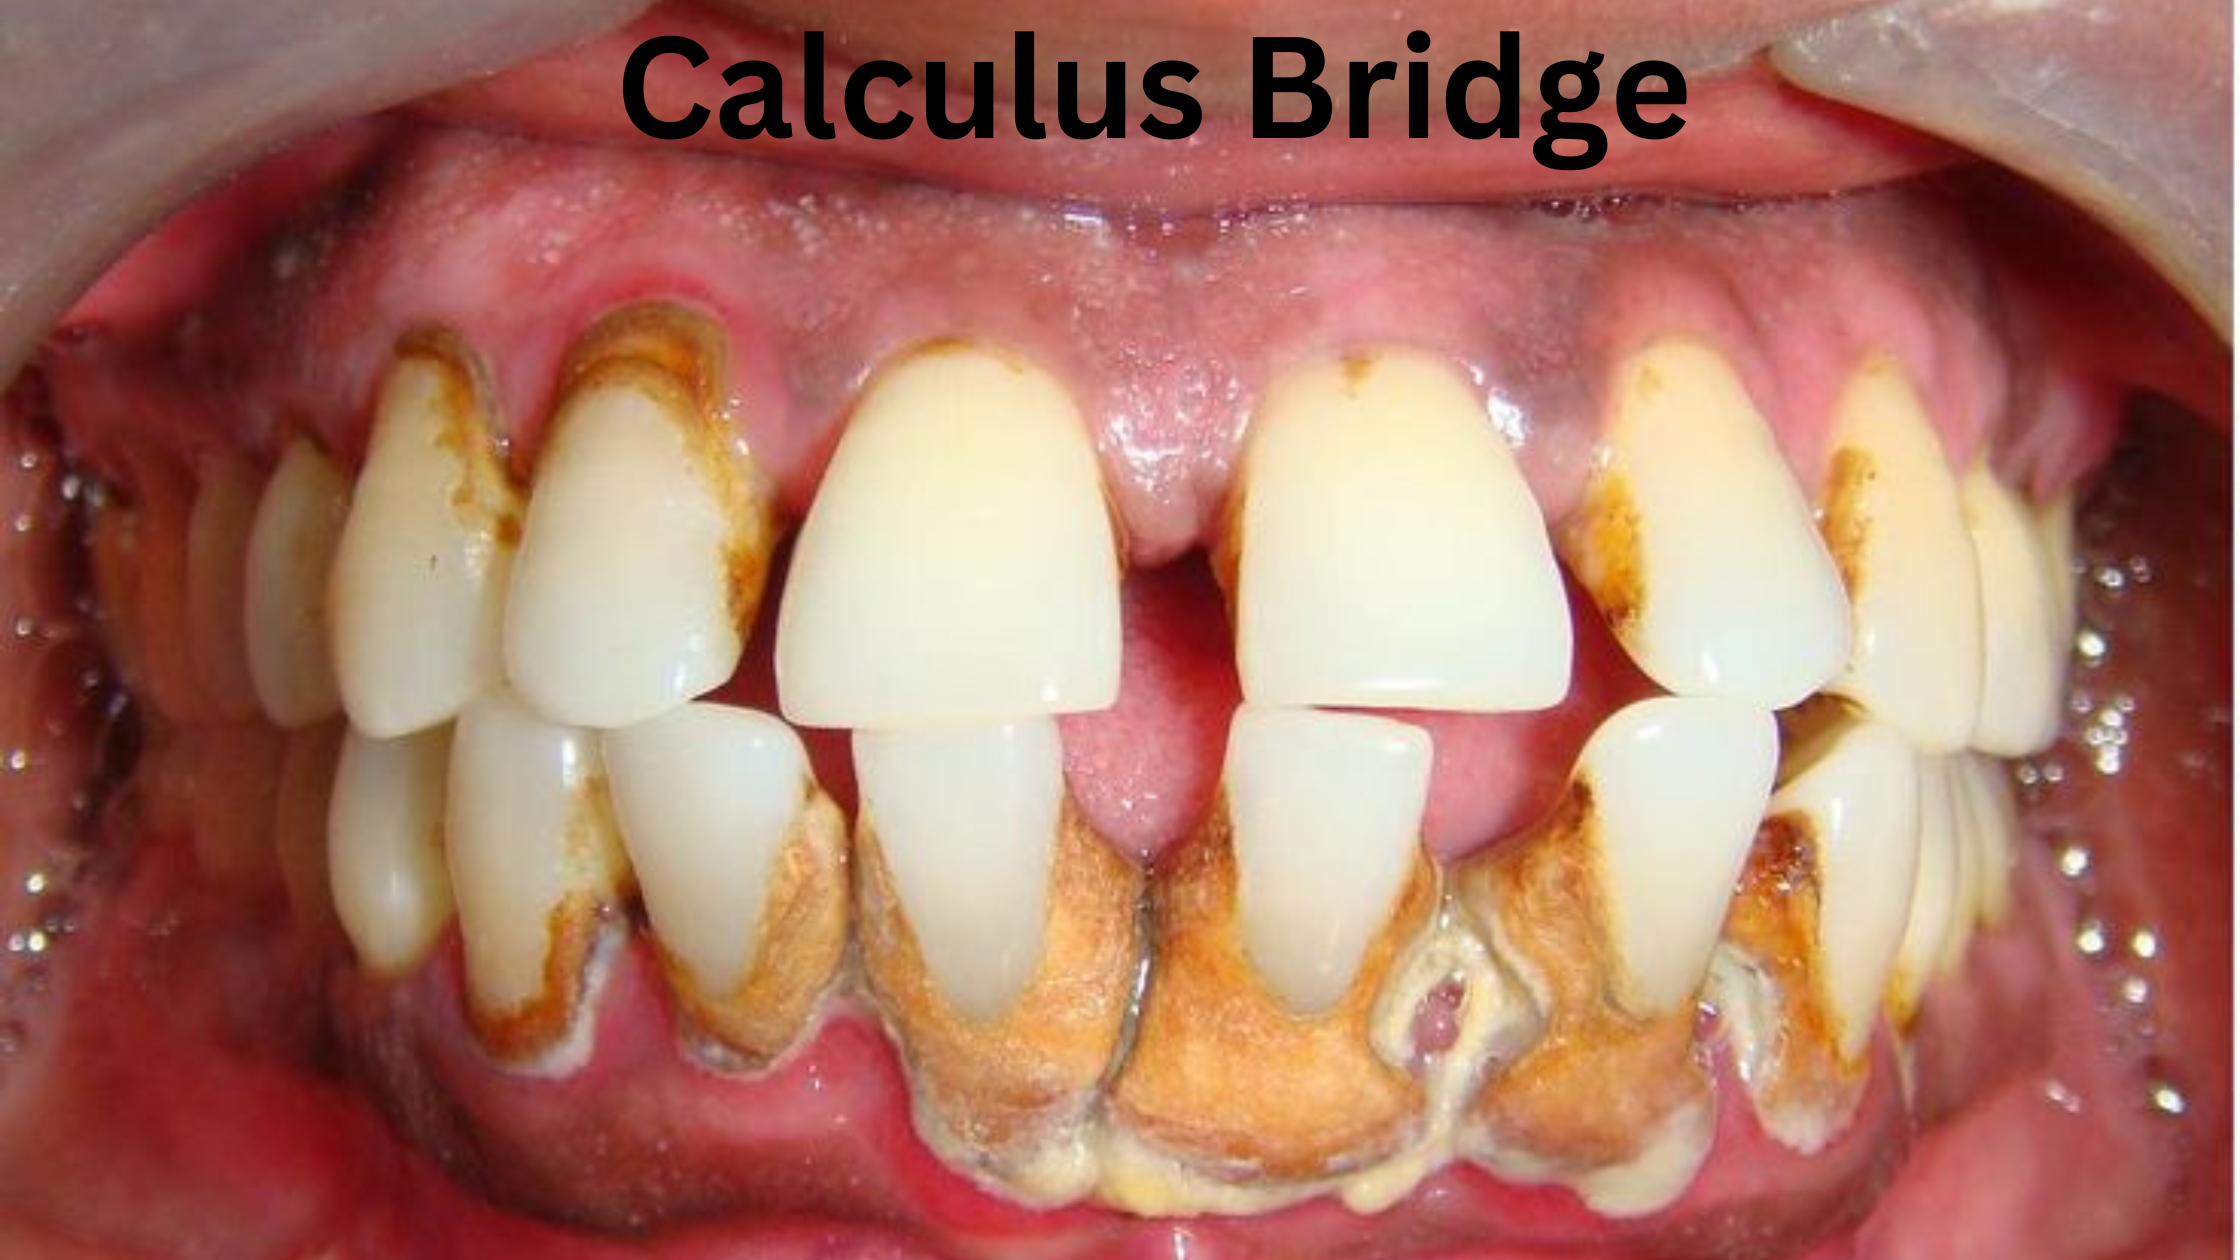
What Is Calculus Bridge?
A calculus bridge, also known as dental calculus or tartar, refers to a hardened buildup of plaque on the teeth. When plaque, a sticky film of bacteria, mixes with minerals in saliva, it calcifies and forms a hard deposit on the teeth. This hardened substance can’t be removed through regular brushing or flossing and often requires professional dental intervention, such as a thorough cleaning by a dentist or dental hygienist using specialized tools, to effectively remove it from the teeth and gumline.
The difference between plaque and tartar
If plaque isn’t cleaned on a regular basis, it can gather minerals from your saliva and turn into tartar, an off-white or yellow material.
The front and rear surfaces of your teeth develop tartar accumulation along the gum line. You might be able to remove some tartar buildup with careful flossing, but you’ll probably need to see a dentist to get rid of it completely.
How plaque can become a calculus bridge?
The formation of dental calculus involves three basic steps: plaque formation, maturation and mineralization. The first two steps are actually the formation process of plaque. In the last step, plaque undergoes mineral deposition and mineralization to form relatively hard tartar. The mineralized component of supragingival calculus comes from saliva; the mineralized component of subgingival calculus mainly comes from gingival crevicular fluid. Mineralization is gradually deposited in the plaque matrix, and then the matrix is completely calcified, and the bacteria are gradually calcified. The calcifications first appear in the shape of small foci, gradually increase in size, and merge into large pieces of calculus.
According to research, it happens in one to fourteen days.Because the tartar doesn’t merely remain on your teeth, it can be dangerous. It may start to grow and penetrate your gum line. This calculus can damage the tissue beneath your gum line, resulting in gum disease and tooth decay. It can also stain and appear tan or brown on your teeth.
Side effects of a calculus bridge
Dental calculus is the cause of gingivitis and periodontal disease, because dental calculus can compress the gums, affect blood circulation, cause inflammation and shrinkage of the gums, and its rough surface can easily adhere to a large amount of bacterial toxins, causing an inflammatory reaction in the periodontal tissue. If gingival inflammation is not effectively controlled, it will continue to develop, causing damage to the periodontal tissue, and eventually evolve into troublesome periodontitis. Then the patient will suffer from bad breath, alveolar bone resorption, tooth decay, tooth root exposure, loosening and loss of teeth, etc.
A dental calculus bridge can also lead to these conditions:
Halitosis
Your breath may smell due to tartar accumulation and plaque. This is referred to as halitosis.
Gingivitis
Your gums could get irritated or red. When you brush or floss your teeth, you might notice some bleeding at first. It can develop into periodontitis, a more severe form of gum disease, if treatment is not received.
Receding gums
One more kind of periodontal disease is receding gums. It’s possible for your gums to start pulling away from your teeth, exposing more of your teeth and creating spaces for bacteria to enter between your gums and teeth.
Cavities
Bacteria from your toothbrush may be defended against by tartar accumulation on your teeth. Additionally, plaque and tartar can lead to the formation of microscopic holes in your teeth’s enamel, which let bacteria and acid seep into the tooth and result in cavities.
Tooth loss
Dental calculus can eventually result in gum disease and the loss of one or more teeth if left untreated.
What causes plaque?
Plaque Buildup:
Plaque, a sticky bacterial film that accumulates on teeth, combines with minerals in saliva, forming hardened calculus when not adequately removed through brushing and flossing.
Poor Oral Hygiene:
Inconsistent or inadequate oral hygiene habits, including infrequent brushing, improper technique, or neglecting to floss, can lead to the buildup of plaque and eventual calculus formation.
Diet and Lifestyle:
High consumption of sugary or starchy foods, combined with poor dietary choices, can contribute to increased plaque formation, aiding calculus development.
Saliva Composition:
Individual variations in saliva consistency or chemical composition can influence the rate at which plaque hardens into calculus. Factors like pH(potential Hydrogen) levels and mineral content may play a role.
Alcohol Intake:
Excessive alcohol can cause dry mouth, reducing saliva that washes away bacteria and plaque. This increases plaque buildup, leading to tartar formation on teeth. Poor oral hygiene habits from alcohol use can also contribute to calculus development.
Inadequate Dental Care:
Irregular dental check-ups and professional cleanings allow plaque to accumulate over time, facilitating its transformation into hardened calculus, particularly in hard-to-reach areas that brushing and flossing may miss.
Calculus bridge removal
Once you have a bridge of calculus on your teeth, you can’t brush it off. A professional cleaning can remove all or the vast majority of it,but if it’s deep below the gumline, additional procedures like scaling and root planing might be necessary. Dental scalers or ultrasonic instruments are used to carefully remove hardened plaque, and multiple sessions may be required for extensive buildup, potentially resulting in sore gums post-cleaning.
How to prevent plaque?
Consistent Dental Care
- Preventing a calculus bridge requires consistent dental care to prevent tartar buildup and plaque formation.
- Maintain thorough oral hygiene by brushing teeth twice daily with fluoride toothpaste for at least 2 minutes each time.
- Perform interdental cleaning daily using floss or other tools to remove debris between teeth.
- Reduce consumption of sugary snacks and drinks to limit bacterial growth and plaque formation.
- Regularly visit a dentist for checkups to monitor oral health, identify signs of gum disease or tooth decay, and receive personalized recommendations for a consistent oral care routine.
Mouth Rinse
Consider using mouth rinse in addition to flossing to reach bacteria between teeth. Various types like chlorhexidine (CHX), probiotic, herbal, and essential oil rinses have been studied. CHX, effective but prescription-only, may cause teeth staining and increased tartar. Probiotic and herbal rinses, effective without staining, improve plaque levels. Essential oil-based rinses, such as Listerine Cool Mint, containing oils like menthol, thyme, wintergreen, and eucalyptus, show reduced plaque and gingivitis in studies.
What should I do if I have minor problems with my teeth after teeth cleaning?
Some patients will experience symptoms such as tooth sensitivity, soreness, and increased looseness after tooth cleaning. Among them, tooth sensitivity is mainly caused by the exposure of dentin on the root surface and near the tooth neck after treatment. Usually the symptoms of sensitivity will gradually disappear in the later stage. Such patients should try to avoid eating foods that are too cold, too hot, and too acidic to reduce local irritation. At the same time, anti-sensitive toothpaste can be used to relieve symptoms.
The main cause of increased tooth loosening is periodontal ligament edema and congestion caused by trauma during treatment. This loosening is temporary and generally does not require any treatment. After a few weeks of surgery, the edema will subside and your teeth will recover.
Dental health issues cannot be ignored. Maintain good oral hygiene, brush your teeth frequently in daily life, pay attention to food intake, and do not facilitate the formation of dental calculus. After the “scaling” treatment, it cannot be done once and for all. You must still pay attention to cleaning to prevent dental calculus from coming back.
Related Articles:

Memory care is specialized long-term care tailored for individuals with Alzheimer’s disease, dementia, and cognitive impairments. With our society getting older, the need for memory care options that work is increasing. Dedicated facilities provide memory care to ensure a safe, supportive, and engaging environment for seniors facing memory challenges. The goal of effective memory care is not only to provide assistance with daily activities but also to foster an environment that promotes mental engagement and preserves dignity.
The Importance of Professional Memory Care
Incorporating memory care, FL involves implementing top-notch care standards beyond basic help with everyday tasks. It includes putting into practice treatment methods that are tailored to the distinct requirements of people with dementia and Alzheimer’s. By making this decision, we can significantly improve the well-being of older people, allowing them to maintain their autonomy and mental abilities. Dementia care professionals undergo specialized training to handle the unique challenges of memory loss. These specialists are skilled in techniques that promote cognitive involvement, interpersonal involvement, and emotional well-being, all crucial for improving the overall well-being of seniors with memory issues.
Critical Components of Effective Memory Care
An efficient memory care program generally consists of various essential elements created to meet the specific requirements of elderly individuals with cognitive impairments. These components include:
- Safe and secure environments: These environments are tailored to prevent wandering and ensure safety. Features such as secure outdoor areas, locked doors, and easy-to-navigate spaces are essential in preventing accidents and allowing residents to move freely without constant supervision.
- Engaging activities: Activities are designed to stimulate memory and cognitive function, such as music therapy, art therapy, and reminiscent activities. These activities help maintain cognitive abilities and provide a sense of accomplishment and enjoyment.
- Personalized care plans: Care plans are tailored to address each resident’s specific needs and preferences. This customized approach ensures that each senior receives the care that best supports their physical, emotional, and cognitive well-being.
- Highly trained staff: Staff members are trained to understand the complexities of dementia and Alzheimer’s care. This training enables them to provide compassionate and effective care tailored to each resident’s needs.
The Role of Family in Memory Care
Memory care communities must create a cooperative atmosphere that allows families to be involved in care planning and remain updated on their loved one’s status. Ensuring that the care plan stays in line with the senior’s needs and preferences is possible through effective communication between care providers and families. Involving family members in activities and care decisions can offer emotional support to residents and their families, promoting a comprehensive care approach.
Choosing the Right Memory Care Facility
Selecting an appropriate memory care facility is an important decision. When choosing a facility, families must consider the facility’s location, services offered, staff credentials, and the overall feel of the community. Exploring various establishments and observing how employees interact with residents is advantageous. This process enables families to make choices according to the wishes and needs of their members. Families must locate facilities with complete care plans, diverse activities, and a welcoming environment.
Innovations in Memory Care
Technological advancements and innovative therapies are shaping the future of memory care. These innovations, from virtual reality therapy to robotic companionship, provide new ways to engage and support seniors with cognitive impairments. Virtual reality therapy can transport seniors to different environments, helping them to recall memories and engage in activities that they might not otherwise be able to. Additionally, robotic companions can provide comfort and interaction, reducing feelings of loneliness and isolation.
Steps to Support a Loved One with Memory Loss
Supporting a family member with memory loss can be challenging, but there are numerous methods that families can put into practice:
- Educate yourself: Learn about dementia and Alzheimer’s to understand what your loved one is going through. This knowledge can help you provide better support and empathy.
- Maintain open communication: Regularly contact healthcare providers and memory care professionals. This ensures you are up-to-date on your loved one’s condition and care plan.
- Participate in support groups: Receiving advice and learning from individuals in comparable circumstances can be highly beneficial. Support groups offer an opportunity to discuss challenges and gain coping strategies.
- Encourage engaging activities: Promote activities that stimulate cognitive function, such as puzzles, reading, and music therapy. These activities help maintain cognitive abilities and provide enjoyment.
- Ensure a safe living environment: Minimize potential hazards and support independence by creating a safe living space tailored to your loved one’s needs. This can include removing tripping hazards, ensuring adequate lighting, and using assistive devices as necessary.
Conclusion
Memory care is a vital aspect of senior care that requires a thoughtful and comprehensive approach. By understanding the importance of professional memory care, involving families, and staying informed about innovations and best practices, we can enhance the quality of life for seniors facing memory loss challenges. Choosing a suitable memory care facility and supporting loved ones through their journey can make all the difference in their well-being and happiness. Creating an environment where seniors feel valued, supported, and engaged is essential, ensuring they live their lives with dignity and joy.
Learn the proper techniques for safely removing piercings to avoid complications and promote healing. Discover step-by-step instructions and essential tips for a smooth and hygienic piercing removal process.
How to Remove and Install Piercings at Home?
You may need to remove your piercing for different reasons. Perhaps you may think that it is not suitable for the environment you will go to, or you may need to take it off for essential reasons. You may just want to take it off because you are bored. In this case, you can easily remove the piercing at home and then easily put it back whenever you want. You should definitely wash your hands before removing or installing. Afterwards, you can ensure the necessary hygiene with the help of cologne or a disinfectant.
You can get help from the part called the ball, which is found in piercing models. The gun is designed to be rotated mostly clockwise during removal. This may differ from model to model. It is important that you move slowly and in a controlled manner, being careful not to make sudden movements while turning, as this will minimize the possibility of tearing or wounding in the hole part. After removing your piercing, you should take care to moisturize the area by applying ointment. If you are not going to use it again, you can continue the necessary maintenance until the hole in the area is closed.
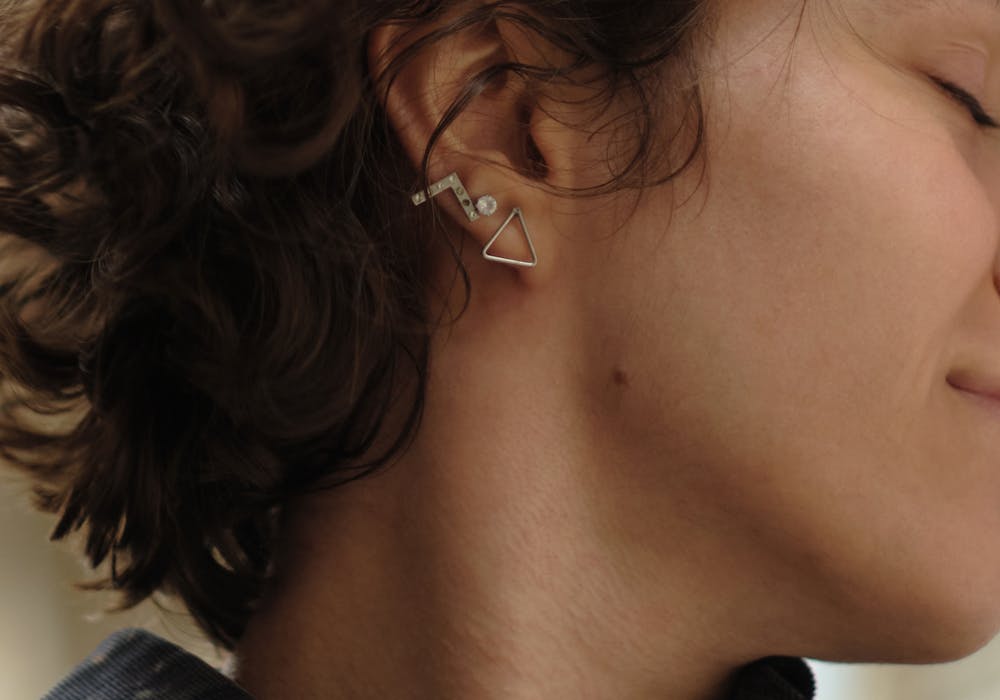
How to Remove Tragus Piercing?
Understanding Cartilage Piercing
This type of piercing; It is used by attaching it to the tiny cartilage wing located in the front of the ear canal, which is directly connected to the head area. It is called cartilage piercing or ear piercing. After the procedure, redness may occur in the relevant area for a few weeks, and a crust may form on the pierced part. At the same time, tenderness and warmth may be felt. By performing the necessary maintenance, you can minimize these possibilities and make the healing process faster.
Care and Maintenance
After the piercing process, you should be careful not to touch the piercing in order to prevent formations such as germs / bacteria. It is important, especially on the first day, that the pierced area does not come into contact with products such as soap, shampoo, or disinfectant. You can get help from clean water and odorless soap to clean and soften the crust formed in the area. The water you use must be warm. You should not immerse the piercing in water for a minimum of three weeks after the installation. When cleaning your piercing, you should avoid rubbing it and dry it with a clean paper towel or cloth. During the cleaning process, you should not use products containing chemicals, alcohol-based or artificial ingredients.
Healing and Aftercare
Recovery time can range from approximately 3 to 6 months. During this period, necessary maintenance must be carried out in order to avoid different complications. Otherwise, there is a possibility that recovery may take up to 1 year. It is not recommended to take a shower on the first day after getting a piercing. Especially in the first week, you should apply an antibiotic-containing cream before taking a shower and do not forget to apply a dressing after you get out of the shower.
One of the things that should be taken into consideration is not to leave the area wet. After the healing process is complete, you can change your piercing if you wish. If you want to remove a tragus piercing, after washing your hands thoroughly and ensuring that you have maintained the necessary hygiene, you should remove the ball at the back while supporting the front of the tragus with your finger and then pull the pin forward. It is extremely important to stretch the area of interest towards your face when removing it.
How to Remove Ear Piercing?
One of the most preferred areas for piercing use is the ear. One of the reasons for this is that there are many points in the ear area that can be pierced. In order to avoid confusion, there is a name determined for each region. Many people wonder whether this procedure is painful or not. This may vary from person to person, but also depending on the ear area where the procedure is performed and the professionalism of the person performing the procedure.
Therefore, it is possible to say that the area of your ear that you will pierce will directly affect the pain you will feel. While the earlobe is the least painful area in the ear area because it consists of flesh, procedures in the cartilage part may cause more pain due to the harder area. The healing process is also directly related to this situation.
In addition to the expertise of the people performing the process, they also work in hygienic conditions; It is effective not only in making the procedure easier and more painless, but also in making the healing process faster and in minimizing problems in the relevant area. If you want to remove or change your ear piercing; It is a priority for your hands to be clean and dry to avoid problems such as inflammation. You should disassemble the ball and pull the pin part with slow and delicate movements. You can move more easily by tying your hair before the procedure to prevent it from getting in the way.
How to Remove Nose Piercing?
The nose, which is one of the focal points of our face, is one of the most preferred areas by piercing lovers. It is possible to achieve a very pleasant appearance by making a choice that suits your face shape. The procedure is performed on the soft tissues on or around the nose. It is important to make your choice among the varieties that will make you feel comfortable on your skin, as well as to consider the ones made of quality and stainless materials. It is important for health that the equipment used during the procedure is sterile. Afterwards, it is necessary to use lotions with antibacterial properties to prevent inflammation. Piercings worn through nose piercing mostly have a clip-on design. To remove it, simply turn the clip. However, removal is not recommended until the end of the healing period.
How to Remove a Stuck Piercing Ball?
Piercing ball is available not only in the mass models from which it takes its name, but also in pointed, figured or solitaire-shaped varieties. It helps you to take off or put on your jewelry easily. In some cases, compression may occur in the ball part of the piercing you use. You can try turning it clockwise and counterclockwise. If you cannot get results, you should get help from an expert to prevent bleeding, damage to the perforated part, and most importantly, to avoid inflammation.
Art of Piercing: Aesthetic Trends and Health Considerations
Piercing, a beloved adornment embraced by individuals of all genders, entails the insertion of jewelry into the perforated layer beneath the epidermis, often puncturing through the adipose tissue.
This intricate process can extend to the cartilaginous structures, demanding meticulous attention during both the application and removal phases to avert skin distortions and mitigate the risk of microbial contamination.
Choosing Authenticity: Material Selection and Environmental Consciousness
Foremost, the authenticity of the chosen piercing design warrants scrutiny. Given its intimate contact with the skin, meticulous consideration of high-grade materials is imperative to safeguard personal health. Equally pivotal is the setting in which the piercing is to be affixed; a pristine, sanitary environment is non-negotiable to forestall potential complications.
Evolving Trends: Style Dynamics and Personal Preferences
As sartorial tastes evolve incessantly, deliberation on the longevity of piercing fashion becomes imperative. The versatility of piercing placement accommodates diverse personal styles and aspirations, albeit subjecting individuals to varying degrees of discomfort and susceptibility to adverse effects such as hemorrhage and inflammation.
Navigating Societal Constraints: Institutional Policies and Continuous Care
Navigating institutional prohibitions on piercing, prevalent in educational and organizational settings, necessitates thoughtful deliberation. Furthermore, initial adherence to a designated healing period post-piercing installation is paramount, with subsequent removals discouraged to mitigate potential complications.
Conclusion:
The piercing you provide is extremely important in order to ensure healthy use and to avoid any undesirable health problems. The quality of the materials used in the product directly affects each element. For this reason, you should be careful to choose reliable brands.
Read Also:
Understanding Degloved Face Injuries: Types, Causes And Treatments
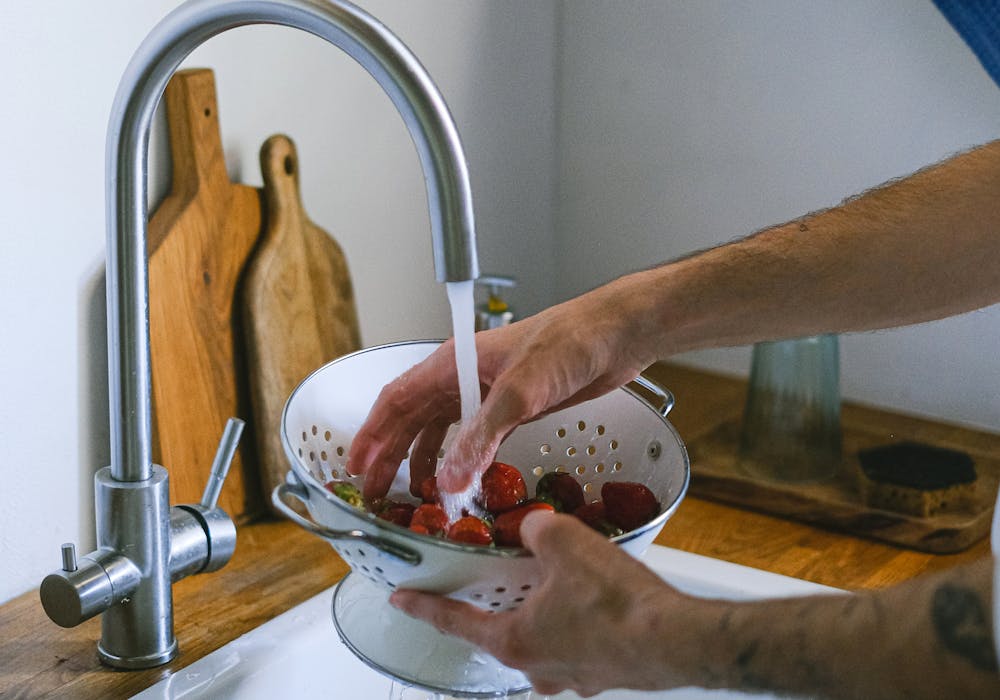
The strawberry is the iconic fruit of world confectionery due to its very aesthetic appearance, exquisite and versatile flavor. But it is also part of almost any healthy diet. It is no wonder, since its important contribution in nutrients benefits the body greatly: it controls sugar, facilitates the elimination of uric acid, has alkaline properties, combats anemia, favors the immune system, among many other benefits.
However, if not properly sanitized, it can become quite the opposite, exposing the body to numerous dangerous pathogens such as cysticercosis, hepatitis A and others. For this reason, we will share with you how to clean strawberries in the correct way, using different natural and homemade antiseptics.
How to clean strawberries with vinegar
White vinegar has recognized antimicrobial properties, excellent for disinfecting fruits, and it is also non-toxic. Most of its antiseptic action comes from its versatile pH, which is acidic, but can change to alkaline. In this way, it eliminates or neutralizes many types of microorganisms.
However, it is important to know that its effectiveness is around 80%, since there are microbes that it cannot eliminate or inhibit.
To disinfect strawberries with vinegar, follow these steps:
- Wash your hands very well for 20 seconds.
- Sanitizes the work area very well. Disinfect the table, knife, board, etc.
- Select the strawberries. Separate the damaged ones from the whole ones and sanitize them separately . Do not remove the leaves to wash them. If you do, you open the door to microorganisms and can contaminate the fruit.
- Prepare a large container with half water and half vinegar . Let the strawberries sit in the container for 15-20 minutes.
- Rub the liquid over the surface of the strawberries. Use a special brush for this job. Do it carefully so as not to mistreat them, since strawberries are very delicate.
- Rinse them very well under running water.
- Pass the strawberries through the strainer and then dry them very well , using paper towels. Strawberries should never be left wet, as this accelerates their deterioration process
How to clean strawberries with salt
Sea salt is a natural antiseptic that was already used in ancient times. It is very efficient, but its application can slightly alter the original flavor of the food (it gives it a salty touch). However, it is an excellent alternative, since we will always have it on hand. To disinfect strawberries using salt, follow these steps:
- Wash your hands thoroughly.
- Cleans the work area very well .
- Sort the strawberries. Separate the damaged ones from the whole ones and disinfect them separately . Leave both the stem and the leaves.
- Pour 1 liter of warm water and a teaspoon of salt into a large bowl . Let them rest for 5-10 minutes.
- Clean the strawberries. Scrub them with a soft brush or your hands. Do it by taking advantage of the antiseptic water that covers them. Use little force, be subtle or they will break down.
- Rinse them with plenty of water under tap water.
- Pass them through a sieve and then dry them carefully , using absorbent kitchen paper.
How to clean strawberries with baking soda
Baking soda is a water-soluble compound that has a slight alkaline taste. When this product is exposed to a somewhat strong acid, it decomposes into carbon dioxide and water. This reaction makes it an effective natural , non-toxic and tasteless disinfectant , perfect for sanitizing food!
- Clean your hands and all the necessary elements to disinfect the strawberries.
- Choose the strawberries . Do not put the damaged ones together with the whole ones and disinfect them separately. Do not remove the stem or leaves.
- Pour 1 liter of warm water and 2 teaspoons of baking soda into a large bowl . Wait for 15-20 minutes before proceeding to the next step.
- Clean the strawberries . Rub them with your fingers or a special brush, taking advantage of the antiseptic water that covers them.
- Rinse them with plenty of water . Let the tap water run over them.
- Dry them very well but carefully. Pass them through a sieve and dry them with absorbent paper.
How to clean strawberries with lemon
Lemon is a magnificent natural germicide due to its high level of acidity. This transforms the pH in bacterial cells, developing an acidic environment in which the microbes cannot survive. Much is said about its effectiveness, even putting it above vinegar. If you want to use this natural product to clean strawberries, follow these simple steps:
- Wash your hands and everything necessary to sanitize the strawberries.
- Select the strawberries . Separate the damaged ones from the whole ones and sanitize them separately. Leave the stem and leaves.
- Wash the lemons very well , rubbing the peel with a brush and rinsing them with plenty of tap water.
- Place the strawberries in a large bowl with 1 liter of water and ½ liter of lemon juice . Let them rest for 15-20 minutes.
- Scrub the strawberries with a soft brush . Take advantage of the antiseptic water that covers them while you rub them. Run your fingers to check that there are no traces of dirt or other dirt.
- Rinse them with plenty of water . Do it without exerting too much force on them.
- Dry them very well but without mistreating them . Help yourself with a strainer and use absorbent paper towels.
How to disinfect strawberries without chlorine
If we do not want to sanitize the strawberries with chlorine, there are many other healthier alternatives, but perhaps with less effectiveness. Common hydrogen peroxide, the one sold at the pharmacy, is used to sanitize food, because it is not toxic and eliminates microbes.
Hydrogen peroxide or hydrogen peroxide has antiseptic properties, capable of eliminating microorganisms through oxidation, as it produces a controlled burning process. Now, how do we disinfect strawberries with this product?
- Clean your hands. Every time you sanitize food or work with anything in the kitchen, you should wash your hands for 20 seconds, rubbing them all over.
- Sanitize the work surface and all necessary materials.
- Sort the strawberries. Separate the damaged ones from the whole ones and disinfect them separately . Do not remove the stem or leaves.
- Place 1 liter of water in a large bowl with ½ cup of hydrogen peroxide (10 volumes, for medical use) and follow the same method that we used to disinfect the lettuce : wait for 15-20 minutes until the antiseptic works. effect.
- Rinse the strawberries with plenty of water straight from the tap.
- Pass them through a sieve and dry them with a paper towel. They must be completely dry. During the process, try to treat them very delicately, because they are damaged very easily.
Read Also:
-
 Top2 years ago
2022 US House committee releases Trump’s tax returns, capping a years-long battle
-

 Top2 years ago
Interview With Niantic CEO John Niantsullivan
-

 News1 year ago
USPS EMPLOYEE ASSISTANCE PROGRAM SERVICES AND BENEFITS
-

 Top1 year ago
Understanding the Healing Process of Nose Piercings – A Comprehensive Guide
-

 Auto1 year ago
Top Porsche Taycan Incentives: Save Big
-

 Business12 months ago
Does 7-Eleven Take Apple Pay
-

 Business11 months ago
Beware Of Fake Emails And Fake Apple Pay Images
-

 Tech1 year ago
USPS LiteBlue ePayroll: A Comprehensive Guide